| Network Notepad Freeware Edition Help |
The Tool Bar
|
|
|
|
||
|
|
|
||
|
|
|
||
|
|
|
||
|
|
|
||
|
|
|
||
|
|
|
||
|
|
|
||
|
|
|
||
|
|
|
||
|
|
|
||
|
|
Navigating
To pan around diagram, hold down the
right mouse button and move the mouse (The mouse pointer needs
to be position over the background of the diagram).
To follow a link to another diagram - Right click the object
and select "Goto next diagram". Objects which link to other
diagrams have a blue caption.
The tool bar back and forward buttons may also be used to
jump to the previous or next diagram.
Adding Objects To A Diagram
Click the Object Libraries Button ![]() to display the current Object Library.
to display the current Object Library.
Drag and drop Objects from the Library to the diagram.
You may also paste Library objects by
selecting the object from the library and then closing or
minimising it.
Point the cross hair where you want to place the objects.
Click the Paste Button again to finish pasting.
To automatically hide the Object Library whenever you select
a new object, enable "Auto Hide" in the setup dialogue.
Tip: Double
right click the background to toggle the last used mode (Paste,
Text, or Link) off and on.
Cutting And Deleting Objects From A Diagram
Highlight the objects you wish to cut or
delete by left clicking them and then hit the Cut Button ![]() to place them on the clipboard. Alternatively hit the Delete
Button
to place them on the clipboard. Alternatively hit the Delete
Button ![]() to remove them completely.
to remove them completely.
Pressing SHIFT+Delete on the
keyboard is another way to delete selected items.
Selecting/ Deselecting Single/ Multiple objects
Objects need to be selected (Red
highlight) and deselected for cutting and pasting. To
select an object, left click on it.
To select or deselect multiple objects at once, drag a
"rubber band" around them with the left mouse button.
You must start selection with the mouse pointer positioned
over a blank piece of background.
To select or unselect additional objects, hold down the CTRL
key while selecting.
To select no objects from the main ring
choose Edit and then Select None, or type CTRL-A.
Clicking the background of the diagram also resets all
selections.
Aligning Objects
To align objects, select them and choose
Format and Align Horizontal or Align Vertical from the Ring
Menu.
When pasting objects and drawing links, objects and lines
are automatically aligned if the Auto Align button ![]() is selected.
is selected.
Resizing Objects
Use Shift + and Shift - to
adjust the size of the current object.
From the ring menu select Format > Resize Mode and then either
Both, Horizontal or Vertical to set the quick resize function.
Objects can also be resized in the Object
Properties
form.
Moving and Copying Objects
To move objects, first
select the objects you wish to move (Red highlight) and then
hold down the Shift Key
while dragging one of the objects to the new position.
To copy objects, select them and then click then Copy Button![]() .
Click the Paste Button
.
Click the Paste Button ![]() to enter Paste Mode and the position the cross hair and left
click to paste copies of the objects. To finish pasting, click
the Paste Button
to enter Paste Mode and the position the cross hair and left
click to paste copies of the objects. To finish pasting, click
the Paste Button![]() again.
again.
Nudging Objects
To nudge all selected objects hold the Shift and press one of the cursor keys.
Changing The Name (Or IP Address) Of An Object
To change the name of an object or change
it's IP address, Double Left Click on current name or IP
address and type in the new details. Press Enter to complete.
You may also change these details by right clicking on the
object and selecting "Properties". See
Object Properties
below.
When specifying IP addresses, you may include additional
information, eg. subnet mask, following a "/" character. Eg.
192.168.55.2 /28 or 192.168.55.2 /255.255.255.240. The "/"
character and any text which follows is ignored when using the
programmable function buttons.
You may insert a Carriage Return in an Object or IP Label using
Shift + Enter.
Adding Text To A Diagram
|
Tip: Double right click the background to toggle the last used mode (Paste, Text, or Link) off and on.
|
|
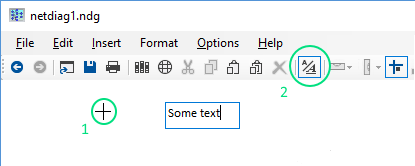
Editing Text
To Edit text in text box, double click on
it.. The Text Mode button will indicate you are in Text Mode.
Press ESC to finish editing the text, or click the text mode
button on the tool bar.
To delete a Text Box, double click it and then hit
backspace. Press
ESC or click the text mode button to complete.
Formatting Text
Right-click text and select Format Text
to bring up the Format Text Form:
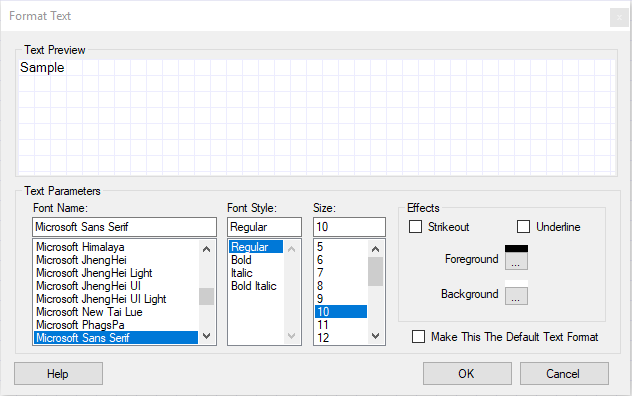
From here you can set the font, colours
and effects for the text.
Make This The Default Text Format - Sets the font, colours and
effects for any default formatted text.
To set text to use
the default font, right click and choose Set to Default Font and
Colours.
Moving Text
To move text, hold the SHIFT key down and drag the text.
|
|

|
Adding Float Text To ObjectsInformation can be displayed when the pointer is held
over an object for a few seconds.
|
Adding Horizontal And Vertical Backbones
|
To insert a horizontal or
vertical backbone, select Insert from the Ring Menu and
then either horizontal or vertical backbone.
|
|
Resizing And Moving Backbones
To resize a backbone, position the cursor
over either end then hold the left mouse button down to drag the
backbone larger or smaller.
To move a backbone, hold the shift key down whilst dragging
the backbone to a new position.
Linking An Object To A Backbone
To link an object to a backbone, click on
the link mode button ![]() and then join the backbone to the object. It does not matter
what Link Type has been selected when doing this.
and then join the backbone to the object. It does not matter
what Link Type has been selected when doing this.
Hiding IP Addresses
To Reveal or Hide IP addresses, toggle
the IP Address Button ![]() .
.
Using The Programable Function Buttons
The programmable function buttons ![]() can be programmed to execute external applications. The
application may be supplied with the IP address or hostname of
the most recently clicked object. F1 for instance is
pre-programmed to Telnet to the IP address of the most recently
clicked object.
can be programmed to execute external applications. The
application may be supplied with the IP address or hostname of
the most recently clicked object. F1 for instance is
pre-programmed to Telnet to the IP address of the most recently
clicked object.
The 5 programmable function buttons are also present in the
pop up menu when you right click an object.
See the
Setup
section for information on configuring the Programmable Function
Buttons.
Printing
To print a diagram use the print button
on the toolbar. If you have a large canvas size the objects will
appear small when printed. Drag the canvas smaller or reduce the
Canvas width and height in the Diagram Properties form to make
the objects to appear larger when printed.
The Zoom Out button on the toolbar functions similar to a Print
Preview function and enables you to see how the page will look
when printed.
The ratio of height to width of the Canvas also determines
whether the page is printed in landscape or portrait mode. If
you ensure the ratio setting shown in the Diagram Properties
form is 1.414 then the Canvas will match an A4 page in landscape
mode. A ratio of 0.707 matches an A4 page in portrait
mode.
| < Contents | Linking Objects > |
|
© Copyright
J.A.Green |